This is the twentieth fourth part of the Availability Anywhere series. For your convenience you can find other parts in the table of contents in Part 1 – Connecting to SSH tunnel automatically in Windows
Today we’re going to solve a problem of RDP session moving your windows around when you connect from multiple machines. Let’s see how it works.
Table of Contents
Problem statement
First, a couple of assumptions what I’m trying to solve:
- I’m using
mstsc.exeto connect to the RDP server.mstsc.exeis the regular Windows RDP client (so called the “blue” client). I’m using the regular application, not the UWP one - I have two machines that I use to connect to the RDP server. These machines are
Client1andClient2. Both Clients have three screens attached. While I’m using physical screens, you’re free to use IddSampleDriver or vSpatial virtual screens. I think the same should apply to other solutions like spacedesk and similar. The same should apply to screens created by BetterDisplay (when you RDP from Mac to yourClient1). Screen1is “at front”,Screen2is “on the right”,Screen3is “on the left”. The actual ordering doesn’t matter but I’ll refer to this later in this post- I use
Client1to connect to the RDP server and I open maximized Browser onScreen1and maximized Notepad onScreen2. I then disconnect and connect to the RDP server fromClient2. At this point, I want Browser to still be onScreen1(“at front”) and Notepad onScreen2(“on the right”). Screen1is my “main display” and it has the taskbar. I want the same in the RDP server (so taskbar should be onScreen1)
I’m going to use screenshots to explain my setup. They are a little trickier to let’s walk one by one.
My setup
First, my Client1 has five physical screens in total. However, I use Screen4 to duplicate my Screen1, and I use Screen5 to keep things outside of RDP. Therefore, I only want to use Screen1, Screen2, and Screen3 in the RDP session (and obviously Screen4 which is implicitly showing Screen1). I also have 5 additional virtual screens created with IddSampleDriver and 2 more virtual screens created with vSpatial. I don’t use these virtual screens (they are turned off).
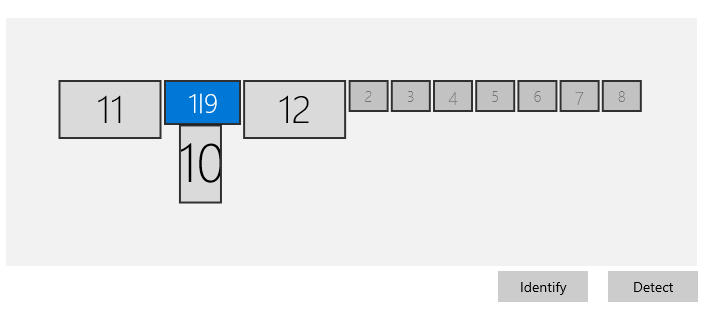
This is what “Display” shows me which from now on I’ll call “Display Setup”:
So this is the mapping:
Screen1(“at front”) isDisplay Setup Screen 1Screen2(“on the right”) isDisplay Setup Screen 12Screen3(“on the left”) isDisplay Setup Screen 11Screen4(duplicatingScreen1) isDisplay Setup Screen 9Screen5(kept outside of RDP) isDisplay Setup Screen 10Display Setup Screen 2-6are IddSampleDriver virtual screensDisplay Setup Screen 7-8are vSpatial virtual screens
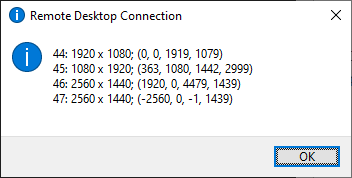
Now I want to use screens Screen1 + Screen2 + Screen3 in RDP session only. Scott Hanselman explains how to do it. We first need to list the screens with mstsc /l and this is what I get (which from now I’ll call “MSTSC Setup”):
So here comes the mapping:
Screen1(“at front”) isMSTSC Setup Screen 44Screen2(“on the right”) isMSTSC Setup Screen 46Screen3(“on the left”) isMSTSC Setup Screen 47Screen4(duplicatingScreen1) isMSTSC Setup Screen 44(the same asScreen1)Screen5(kept outside of RDP) isMSTSC Setup Screen 45
It’s important to notice that numbers do not match between Display Setup and MSTSC Setup. This is very important and makes the whole trouble. Let’s now solve the problems.
Using only a subset of displays in the RDP session
This is actually easy. When you see Scott Hanselman’s blog, it mentions the parameter called selectedmonitors. You use it to specify the comma-separated-list of monitors that you want to use for the RDP session.
In my case, I need to use MSTSC Setup Screen 44, MSTSC Setup Screen 46, and MSTSC Setup Screen 47. So the parameter in my case is:
|
1 |
selectedmonitors:s:44,46,47 |
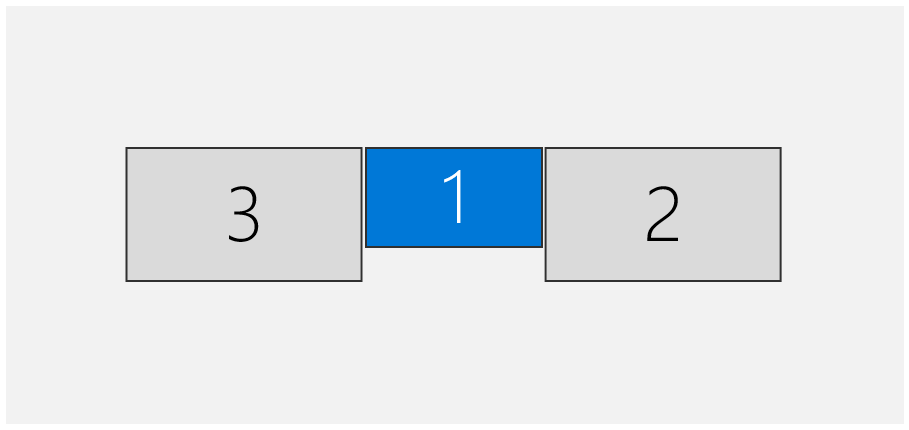
After connecting to RDP, this is what “Display” shows (which I’ll refer to as Display RDP Setup):
In textual form each line is screenId: width x height; (xBegin, yBegin, xEnd, yEnd):
|
1 2 3 4 |
44: 1920 x 1080; (0, 0, 1919, 1079) 45: 1080 x 1920; (363, 1080, 1442, 2999) 46: 2560 x 1440; (1920, 0, 4479, 1439) 47: 2560 x 1440; (-2560, 0, -1, 1439) |
So, here is the mapping:
Screen1(“at front”) isDisplay RDP Setup Screen 1Screen2(“on the right”) isDisplay RDP Setup Screen 2Screen3(“on the left”) isDisplay RDP Setup Screen 3
You can see that there are only 3 screens in the RDP session. Exactly as I wanted.
Controlling the main display in RDP
selectedmonitors parameter controls this. The main display is the first monitor from this list. So, if you have selectedmonitors:s:x,y,z, then the screen x is going to be the main display in RDP. This doesn’t need to match your main display on the host. In my case, my parameter is set to selectedmonitors:s:44,46,47, so the main display in RDP is going to be MSTSC Setup Screen 44.
Making RDP not move windows
This is the trickiest part. Remember that I open maximized Browser on Screen1 and maximized Notepad on Screen2. Based on our mappings above, the Browser is on Screen1 = Display Setup Screen 1 = Display RDP Setup Screen 1 = MSTSC Setup Screen 44. Similarly, Notepad is on Screen2 = Display Setup Screen 12 = Display RDP Setup Screen 2 = MSTSC Setup Screen 46.
Now, these are the things that I believe are correct. I found them empirically and they work for me across 4 different laptops, but your mileage my vary.
- The order of screens in
selectedmonitorsparameter doesn’t matter (apart from choosing the “main display” explained in the previous section) - The numbers from Display Setup do not matter! The numbers from MSTSC Setup do not matter! The only thing that matters is the order of screens from MSTSC Setup
- The resolutions of the screens do not matter! Windows remembers maximized windows positions not based on the geometry (like “the window’s top left corner is in pixel
0,0) but rather as “the window is maximized onDisplay RDP Setup Screen 1“ - You can’t control numbers from MSTSC Setup programmatically. You can only control them by physically moving your screens to different ports/connectors/docking stations/USB adapters, etc.
- To get the windows not move, you need to have screen “passed to RDP” in the same order between
Client1andClient2(between different clients)
That’s it. It may be a little bit cryptic, so let’s delve into how I think it works.
mstsc.exe uses some API to enumerate displays and then applies logic to merge windows or reorder them. Notice, that in my case Display Setup shows 12 screens while MSTSC Setup shows only 4. That’s because 7 virtual screens are turned off, and Screen4 duplicates Screen1.
Now, it seems that mstsc.exe enumerates the screens, and then for each screen checks if it was selected in selectedmonitors. If yes, then it registers the screen in the RDP session. So the code looks conceptually like:
|
1 2 3 4 5 |
foreach(screen in enumerateScreens()): if(screen.id in selectedmonitors) then registerScreenInRdpSession(screen) end end |
This explains why the order of screens in selectedmonitors doesn’t matter. Assuming that, this is what we need to get:
- We want the Browser to still be presented on the
Screen1(“at front”). This screen was registered first in the loop above when connecting fromClient1. Therefore, whenClient2enumerates the screens inmstsc.exe,Screen1must be the first one that matches theifcondition. In other words,Screen1can be in whatever position according toMSTSC Setupand can have any number, but there must be no otherselectedmonitorsscreen earlier in the list ofmstsc.exe /l - We don’t care about resolutions.
Screen1onClient1can have different resolution thanScreen1onClient2. The Browser will still be “maximized on theDisplay RDP Setup Screen 1 - We want the Notepad to still be presented on the
Screen2(“on the right”). Same logic applies:mstsc.execontinues enumerating the screens and the second screen that gets picked must be the screen on the right
Now, how do we control the order of screens enumerated by mstsc.exe /l? The short answer is: we can’t do that programmatically. We need to physically change cables! What’s worse, this order breaks when you change settings like Duplicate screen or Extend desktop to this screen.
How to change cables physically? There are solutions:
- Just plug cable to some other slot in your laptop/PC
- Use docking station and change the order of cables (or move some monitors to your laptop and some through your docking station)
- Use another docking station! Yes, you can have many of them (I actually have 2, that’s a long story)
- Use USB adapters like i-tec USB Type C to DisplayPort Adapter, 4K Video, Supports 2 External Displays. I have two of them and they are great. Your mileage may vary, obviously
- Try hacking
mstsc.exewith things like API Monitor (I haven’t tried that but that seems plausible)
I tested this setup across four different laptops – one with physical screens, two with virtual screens by IddSampleDriver, one with virtual screens by vSpatial. In my case, windows are not moved anymore. I can literally switch from one computer to another with different screen resolutions but all the windows stay where they were. And yes, I had to switch my cables like crazy. In my case it was even worse, because Screen1 was attached directly (and so was enumerated first by Display Setup) but Screen4 was attached by an adapter (and was taking precedence in mstsc.exe /l). It works, though.


